As homeowners, there are many ways we can improve our home’s aesthetic appeal and increase its value. One of the most popular methods is wrapping a house to create a moisture-proof barrier that protects its structural integrity.
Let’s go over two very important things you may want to know before deciding on house wrapping: the installation process and the benefits it provides.

Explaining House Wrapping
Imagine your dream home – a beautiful, sturdy house that protects you from the elements. But did you know that a layer of insulation and moisture protection beneath the surface keeps your home safe and dry?
That’s where house wrapping comes in! Whether made of plastic or paper-based materials like polyethylene or building paper, this layer is installed before any cladding or siding is added, providing extra protection for your home.
This innovative material covers the exterior sheathing of your home, safeguarding your walls and framing from rain, wind, and other threats. It’s installed in designated wall cavities, so it’s not exactly designed to be a DIY home improvement project.
It acts as an air and moisture barrier that shields the exterior walls and provides top-notch insulation. House wrap helps protect your wall system by delivering a water-resistive barrier around the house.
Benefits of Wrapping a House
Not convinced that house wrap is a good idea to help protect your space? Maybe you can consider the following benefits:
– Increased energy efficiency is one benefit of house wrapping, which also helps to seal air leaks and prevent heat loss.
– Mold, rot, and other forms of moisture-related damage can be avoided by using house wrapping as an extra layer of defense.
– Wrapping the exterior of your house helps protect it from the elements, including wind, rain, and snow.
– House wrapping can help to improve indoor air quality by sealing off air gaps that allow external pollutants to enter the home.
– It keeps your home in line with building codes.
Types of House Wrap Material
When it comes to house wrapping, there are two main contenders: plastic-based and paper-based.
If you’re on the hunt for durability and weather resistance, plastic-based (like polyethylene) might be your ideal choice. However, you’ll have to dig deeper into your wallet and ensure it’s installed properly to avoid moisture buildup.
On the more budget-friendly side is paper-based (such as building paper), which is also more breathable. Remember that it might not be as durable or weather-resistant and could tear during installation.
It all comes down to where you live, how much you want to spend, and your home’s unique needs.
The Process for Installing House Wrap
Now that you know a little more about house wraps, what they do, and what they’re made from, you’re perhaps curious about the installation process. Skilled house wrap installers follow a strict process to deliver high quality house wrap results.
Even if you hire a professional contractor, you might want to know what this house wrap installation process is all about.
Step #1: Preparation
Before wrapping a house, there are a few crucial steps to ensure the job is done right. First and foremost, the exterior of the home needs to be prepared. This means stripping away any old siding or cladding and thoroughly cleaning the walls to get rid of all the dirt and grime that may have accumulated over time.
Additionally, any areas of the walls that are damaged or rotten need to be fixed before proceeding with the wrapping process. IF you spot any wall cavity, fill it before continuing.
Taking these steps may require some extra time and effort, but they are essential for achieving a flawless and long-lasting end result.
Step #2: Flashing Installation
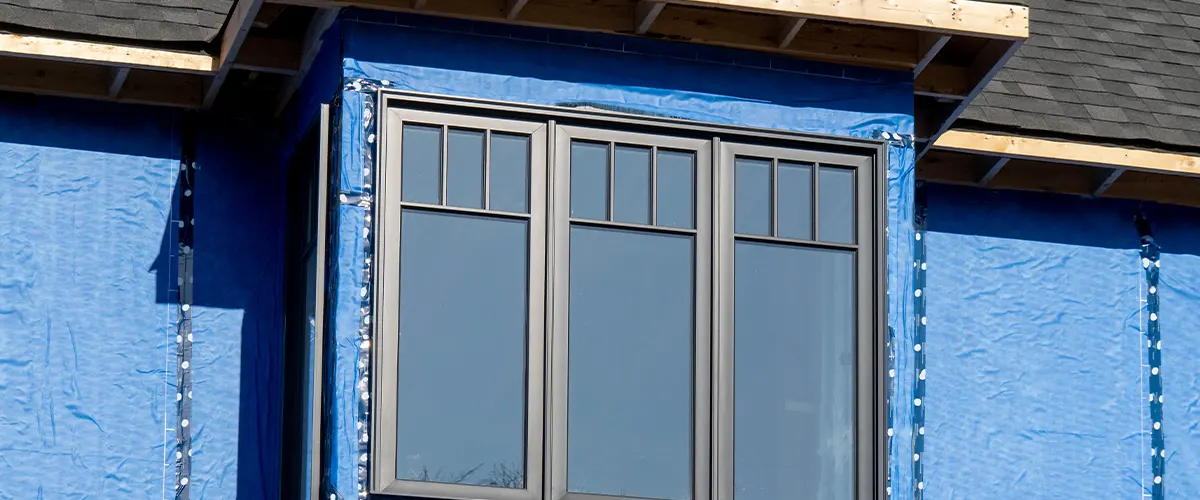
Properly protecting your home against moisture is essential for its longevity. Before installing the house wrap, prioritize installing flashing around doors, windows, and any other vulnerable areas.
Using thin metal or plastic sheets, flashing’s ingenious design will ensure water is effectively directed away from your home’s interior. With the ultimate moisture defense in place, you can rest easy knowing that your home is protected from the damaging effects of water.
Step #3: Install House Wrap
Before the final touches can be added, such as paint or siding, the exterior walls of a house must be properly prepared. One important step is installing house wrap, which acts as a barrier against moisture and drafts.
When it comes to choosing house wrap, there are two main options: plastic-based or paper-based. Plastic-based wraps, like polyethylene, are sturdy and weather-resistant but pricier and less breathable.
Paper-based options, like building paper, are more affordable and breathable, but not as durable or resistant to the elements. The selected type must be expertly layered and taped to prevent air leaks.
Maximizing the efficiency of your building wrap installation involves making sure that the upper layer overlaps the lower layer by a generous 6 inches both vertically and horizontally. But don’t stop there – take the extra time to ensure that your shingling is top-notch to prevent any unwanted water intrusion.
Enhance water management and air sealing with a simple technique: extend house wrap below the mudsill. Not only will this prevent water from seeping in, but it will also create a tight seal for ultimate energy savings. Seal the bottom of the wrap with either caulk or tape to create an impenetrable barrier.
When it comes to installing house wrap around your windows and doors, building inspectors have some specific requirements. They want to make sure everything is sealed up nice and tight, which means you’ll need to use a little butyl-style tape. Don’t worry, it’s not too complicated – you just need to roll it up onto the edge of the brick mold or the window itself.
Step #4: Install Siding or Cladding
Once the house wrap is securely in place, it’s time to dress up your home’s exterior with gorgeous siding or cladding! This adds a stylish layer of protection against the elements and gives your home that coveted finished look.
However, don’t forget to leave a little breathing room between your siding and the house wrap. Doing so will prevent any water vapor from trapping and causing havoc on your home’s exterior.
Step #5: Work on the Finishing Touches
Conclusion
Wrapping your house is essential for protecting it from the elements and controlling moisture balance inside the home. With so many materials and installations available, learning about house wrapping can be overwhelming.
However, with patience, knowledge, and a bit of help from professionals, anyone can properly wrap their house to ensure its longevity and comfort. From Tyvek to Typar and beyond, each house wrap material brings its own set of advantages.
And once you have chosen which material meets your needs best, it’s time to begin installation—which requires attention to detail and familiarity with building science guidelines.
Whether you choose a more advanced professional service or decide to do it yourself, think through each step carefully before beginning construction on any house wrap project.
When in doubt: turn pro! Want professional siding installation? Contact City & Country Contracting today and get the best team working on your home’s exterior and improving your house’s energy efficiency.